
Timesaver Tip: Moves Managment, Part 2
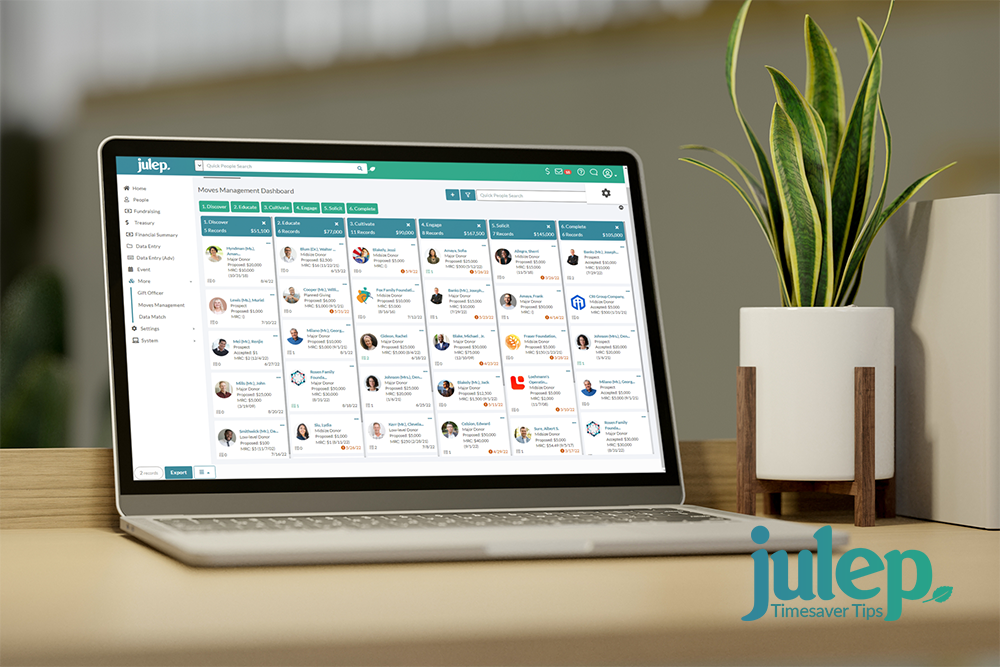
Tracking your major gift program can be a challenge. With multiple donors at different points in the giving cycle, it’s easy to forget to follow-up or not meet deadlines. Julep solves those issues for fundraising and development teams with our Moves Management tracker. This dashboard visually organizes the process of moving prospective donors through the major giving process. Starting with discovery and cultivation through the completed donation, Moves Management helps organizations keep track of how they are reaching these prospects.
Moves Management utilizes familiar features, such as Tasks and Notes. It also incorporates an interactive dashboard that tracks communications, upcoming deadlines, and recent contributions associated with donors or prospects. Once you assign a Move to a People Record, you can move the donor/prospect between life cycle stages, such as Discovery to Completion, with a simple drag-and-drop of your mouse.
Below is Part 2 in how to use the Moves Management dashboard in Julep. For an overview of the Moves Management Features, please see Part 1.
Part 2: How to Use Moves Management Features
Moves Management Search
The Quick Search bar, located at the top of the Moves Management Dashboard, utilizes the same filters and Output Fields found throughout Julep. The Moves Management Search will also generate a list of results with options to export a CSV file of results.

- To open the filters and output fields, click on the funnel button. Toggle between the Filters, Output Fields and Results tabs.

2. Several Search filters are designed for Moves Management:

Manager – Manager assigned to the Move.
Stage – What stage in the cycle, such as Discovery or Cultivation.
Plan – The assigned plan such as Major Donor.
Due Date – The date the move is due.
Opened Tasks – Will filter for moves with opens tasks that need to be completed
Next Task Due – Search for moves with Tasks due on a certain date or date range
3. The Results tab of the Moves Management tab provides several options.

1. View the Dashboard or List Views with the search filters applied.
2. Add a new Move.
3. Edit an existing Move.
4. Delete a Move.
5. Export the results to Excel. Output Fields will help you select what information to export.
Add a Move
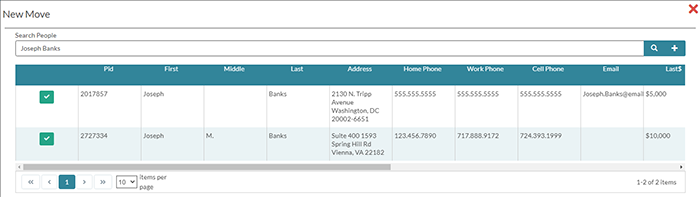
1. Add a new Move by clicking on the blue Plus Sign or Add buttons in any of the view covered above – Dashboard, List or Search.

2. Enter the name of a person with an existing People Profile in Julep to and click on the Search button. You can also click on the plus sign button to add a new People Profile.


3. A list of donors matching that name will generate. Select the correct donor for which you want to create the Move by clicking on the green check button.
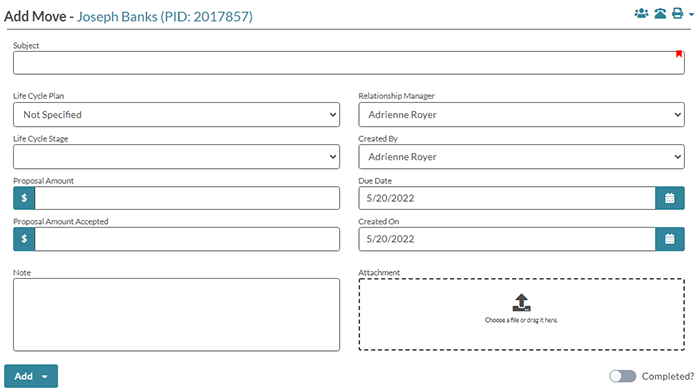
4. A new form will open for you to fill in details about the Move. When finished, click the Save button on the bottom.
Edit a Move
1. To edit an existing Move, select a People Profile from the Dashboard View, List View or Search.
Dashboard: Click on the donor’s name on the card.
List: Click on the green edit button.

2. The Move will open, and you can update all details including the Stage, Proposal Amount, Deadline, and Proposal Amount Accepted. Once your changes are made, click on the blue Save button to complete them.
3. Under Edit Move, you can update:
- Access the relationships connected to this donor.
- Open contact information for the donor.
- Note: on a mobile device, you can call a number with one click.
- Open call sheets to print or download.
- Add attachments of any format type. Uploaded files will also display here.
- Click on the Add button to enter a Gift, Process Credit Cards. You can also add an Action, Event, or Pledge.
4. From the bottom of the Edit Moves window, you can also update the donor’s Life Cycle or stage in Moves Management.
